鉋: Kanna. n.: A vehicle for learning about wood. A means of learning patience.
Step 6: Osae, can you see?
With work on the main blade, kannami, out of the way for the most part, we next turn our attention to the chipbreaker, osae-gane (押金) The term 'osae-gane' literally means the metal which presses. An alternative name for the osae-gane is ura-gane. The pronunciation of the word osae-gane is not the most obvious thing in world, so I'll break it down phonetically: oh-sa-eh-gah-neh
As with in the previous blog entry, I thought it might be helpful to readers to have an illustrated breakdown of terms associating to the chipbreaker:
![]()
The main point of difference in relation to the terms associated to the main blade are the mimi ('ears'). On the main blade the mimi are the corners of the cutting edge, on the sub-blade they are the bent-over or fattened upper ends of the iron body.
Chipbreakers come in two basic varieties, those with a laminated construction, and those which are not. The cheaper planes usually come with a non-laminated chipbreaker, and for the function they provide in the plane itself they are acceptable.
A lot of blacksmiths concentrate on forging blades and do not normally also make a chipbreaker. Yokoyama would be an example - he rarely makes osae-gane. In such a circumstance, the plane will come with a chipbreaker - unless you specially ordered it as a single-blade plane - however the osae-gane which comes with the tool is a generic one made elsewhere, possibly in large batches by people who drink more than is healthy, if you know what I mean. This outsourcing can be good, or not so good, depending. Maybe it boils down to whether it was a Monday or not. If you want a chipbreaker made by the same blacksmith, using the same cutting steel as is found in the kannami, then you need to specify this when ordering in some cases, the term being tomo-osae. Osae is short for osae-gane, while tomo means 'with'. The Japanese term for 'friend', just for a little background, is tomo-dachi.
As with the kannami, the chipbreaker might come to you twisted and with sori. And as before, you could choose to ignore the ramifications and just plow on ahead and flatten the hagane portion of the chipper on a sharpening stone. As with the kannami, if the hagane on the chipper is curved, and you resort to the short cut, the expedient of flatting the entire portion of hagane upon the stone, a gourd shaped ura-suki will result. I can assure you that you won't be put in prison for this - it's highly unlikely that anyone else in your circle of acquaintances will have the foggiest notion there is something amiss, but if a Japanese plane guru shows up at your shop one day, you may wish to keep the chipbreaker with deformed ura on the down-low. It can be our little secret.
If you choose however to try and make a nicer ura on the osae-gane, it is possible to follow all the same steps as have already been shown in this thread for dealing with a main blade having 'problems':
-ura-age to remove twist
-ura-dashi to shape the ura-suki
-working the ura-suki with a piece of sharpening stone to improve its shape
Some people do follow all those steps and end up with a beautiful ura-suki on their chipbreaker, thin legs and ito-ura. When you think about it though, there is no reason other than aesthetics and pride to go to such an extent of refined finish with the osae-gane. After all, the sub-blade doesn't fit into a wedge-shaped opening in the dai, but sits on top of the kannami, essentially bearing on three points. Thus, the shape does not have to be as precisely set and kept up. So long as the edge of the chipper is flat and bears cleanly against the land of the main blade, all is good.
Also, the hagane portion of the osae-gane is very short, and the trick of sticking a regular size feeler gauge under the surface to ascertain the sori is not going to work, and detecting twist is not going to be easy either with such a short registration surface. And again, all that matters is that the chipper meet the main blade cleanly, ura to ura, and if the hagane portion is twisted it is somewhat irrelevant.
Tapping out a thin piece of metal with a shorter bevel is much trickier than a larger blade, and it is a riskier proposition. If it is not necessary for practical reasons, then the risk (cracked or chipped blade) seems to outweigh the benefits (a pretty ura-suki). If you choose to perform ura-dashi on a sub-blade, I suggest using a lighter and smaller hammer than you would use on the main.
And, finally, the chipbreaker, once it is set up, is not really worked again, with little to no future need to 'sharpen' it, tap it out, maintain the shape of the ura-suki, etc.. So, the reasons one might take care of the shape of the ura-suki on the main blade simply do not apply to the sub-blade.
All of the foregoing realities means that setting up the osae-gane can follow a different path than the one followed with the kannami.
Before you tackle the osae-gane set up, it is worthwhile taking a look at its shape, which should be slightly domed. Use a straightedge to assess.
Here's a perfect one:
![]()
The domed shape means that when the chipper is under the osae-bo (fixing pin) the pressure will be evenly spread out over the surface and it will slightly flatten out, maintaining even contact along the ura-to-ura meeting zone..
Now, here's a shitty one:
![]()
This one was hopeless. If fitted under the osae-bo, the sides of the chipper will be pressed down hard, but not the middle, which can lead the chipper to bulge slightly in the middle, losing positive registration with the main blade right in the middle of the land at the edge where it is most critical.
You could try to repair such a chipper, using a similar technique to that used to remove twist from the main blade, setting up the chipper on an anvil with copper shims under both sides and then whomping the middle with a drift to obtain a bulged shape. More drastic solutions involve filing metal off of the top of the osae-gane until it does have the domed shape, which makes a mess out of the part, appearance-wise. Or, you could smack the osae-bo in the middle to bend it downward to meet the middle of the chipper, but this is a poor solution as a bowed osae-bo can more readily rotate when the chipper is pushed tightly against it.
A more radical repair is to file the osae-bo to obtain clearance at either side, like this:
![]()
That step seems a bit drastic to me, and weakens the osae-bo to a degree, so it's not what I would do if I had other options available.
Or you could send the defective chipbreaker back to the seller - what I would recommend you do in most cases. In this case, I elected to make the plane a single blade (ichi-mai ba) only, and toss the chipbreaker out altogether. The plane maker in question with that particular blade set has recently retired, and didn't often make osae-gane, and his main blade was the one in previous posts which was twisted and deformed, so I decided to cut my losses, so to speak.
Once you've got a good chip breaker to deal with, we move onto flattening the back.
I place a piece of 1/2"-wide UHMW 0.005" adhesive-backed tape on the various chipbreakers I had to set up:
![]()
I move the back along the edge of the scrupulously-flattened coarse stone, keeping all the pressure on the bevel:
![]()
I do about 10 strokes on each side of the stone, then I turn the blade over and make use of the middle strip of the stone to work the bevel for 10~20 strokes:
![]()
Then the stone is dressed flat again and the process repeated, as needed.
After a round or two, you can see an even scratch pattern formed along the land of this osae-gane:
![]()
The UHMW tape definitely lasts longer than the other tapes I have tried.
The bevel is now roughed in after work on the coarse stone:
![]()
On to the medium stone, where the process is repeated. A good test for when you have a flat bevel is that the blade will stick to the stone on its bevel:
![]()
After the 3000 stone the bevel is more refined:
![]()
Here's the back of another chipper after the 3000:
![]()
Another one:
![]()
If your main blade is straight along the edge, the osae-gane should also be straight. If the main blade is formed with a curved edge, then the osae-gane should also be finished to that same curve. When the osae-gane is set back from the blade edge, it needs to be set back evenly all the way across, which would be impossible if the main blade was curved and the osae-gane was straight.
Step 7: Ni-dan Togi
We follow a slightly different procedure with prepping the bevel of the osae-gane as compared to the main blade, kannami. The kannami is taken out to as sharp a degree as you want or are able to take it, but the edge of the osae-gane is not meant for slicing, but for breaking the chip. It's more like a plow than a blade. The osae-gane needs to have a second bevel at the blade tip, and this bevel serves as a little wall to repel the invader, so to speak.
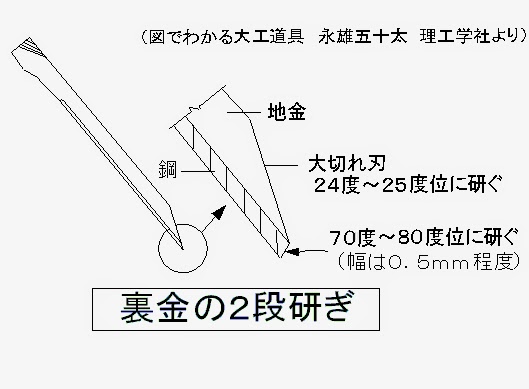
Here's the geometry - the bevel of the chipper is usually around 24˚~25˚, and a 70˚~80˚ secondary bevel - ni-dan - is placed at the very tip:
![]()
The above drawing is from the book 図でわかる大工道具 (Zu De Wakaru Daiku Dōgu). The length of be secondary bevel is shown as 0.5mm, however this should be taken as a generic number, somewhere in the middle of the range. A plane intended for rough stock removal will have a larger mouth opening and take thick shavings, and so can accommodate a wider secondary bevel on the chipper - up to 1.0mm. A finishing plane will have a tight mouth and take the thinnest shavings, so the secondary bevel can be around 0.2mm.
The purpose of the secondary bevel is to fold back the shaving just after the main blade takes the cut:
![]()
Given the function of the secondary bevel, some might conclude that the secondary bevel could be large as we please without penalty. This is only true however if one takes no account of the plane mouth's opening. The relationship between the secondary bevel on the chipper and the mouth opening is an important one and not immediately apparent, so I think it might be good to take a moment here to have a look at that....
The mouth opening is called ha-guchi (刃口) or kuchi-ba (口場). A narrow mouth, as might be typical on a finishing plane, is on the order of 0.5mm wide. With a chipbreaker having a secondary bevel of 0.2mm width, the shaving takes the following route:
![]()
Keeping everything else the same (depth of cut, width of mouth, set back of chipbreaker from main blade edge), we now use a chipbreaker with a 0.75mm wide secondary bevel:
![]()
As you can see, the wider secondary bevel on the chipbreaker means that the entire piece is set further down the main blade and the result is likely to be shavings getting jammed in the mouth. With a wide mouth opening the large secondary bevel works fine of course.
There are two schools of thought on what the secondary bevel angle should be. Some put it at 40˚~50˚, while others put it at 70˚~80˚. The steeper the bevel, the more pronouncedly the shaving is broken back. Some woods will plane fine with a 40˚~50˚ secondary bevel. If you run into problems with tear out though, the bevel can be steepened to improve the chip-breaking aspect. I've tended to set up my planes with the 70˚~80˚ secondary bevel, however this is in part a reflection of the woods I've been working in recent years.
To establish the secondary bevel, place the sharpened osae-gane on a middle-grit stone, angling it up so that the ura side (the hagane) is tilted 70˚~80˚ relative to the stone - here closer to 70˚:
![]()
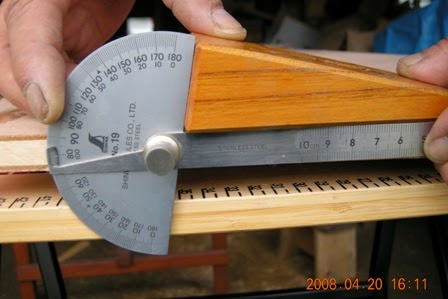
If you're unsure of the angle, you could make up a wooden block to use as a jig, here set at 80˚:
![]()
Work the secondary bevel angle on the stone 10~15 strokes, then repeat the process on the finishing stone, and re-dress the ura to clean up the bevel.
I tend to err on the side of caution with this step in terms of the secondary bevel size, as it is a little easier to add more secondary bevel later on than it is to reduce it. You can see the secondary bevel in this view:
![]()
The secondary is probably sitting at around 0.1~0.15mm at this point.
Many articles on Japanese plane set up will next tell you to set the osae-gane to fit onto the main blade. I'd advise against that. It can wait for the time being, as there are other things to deal with first. If you set up the osae-gane now, you may have issues later on involving the osae-bo and/or the overall fit of the blades into the plane.
Removing the UHMW tape seems to bring with it a little black:
![]()
The osae-gane looked fine after I rubbed them a few times with a cloth, however, so all was good.
We've now got the kannami and osae-gane most of the way there. I leave final polishing of the blade bevel and ura until later on. The osae-gane has to fit between the main blade and the osae-bo, and the main blade position is relative to it's fit within the dai, which we turn our attention to next.
Thanks for visiting the Carpentry Way.
Step 6: Osae, can you see?
With work on the main blade, kannami, out of the way for the most part, we next turn our attention to the chipbreaker, osae-gane (押金) The term 'osae-gane' literally means the metal which presses. An alternative name for the osae-gane is ura-gane. The pronunciation of the word osae-gane is not the most obvious thing in world, so I'll break it down phonetically: oh-sa-eh-gah-neh
As with in the previous blog entry, I thought it might be helpful to readers to have an illustrated breakdown of terms associating to the chipbreaker:
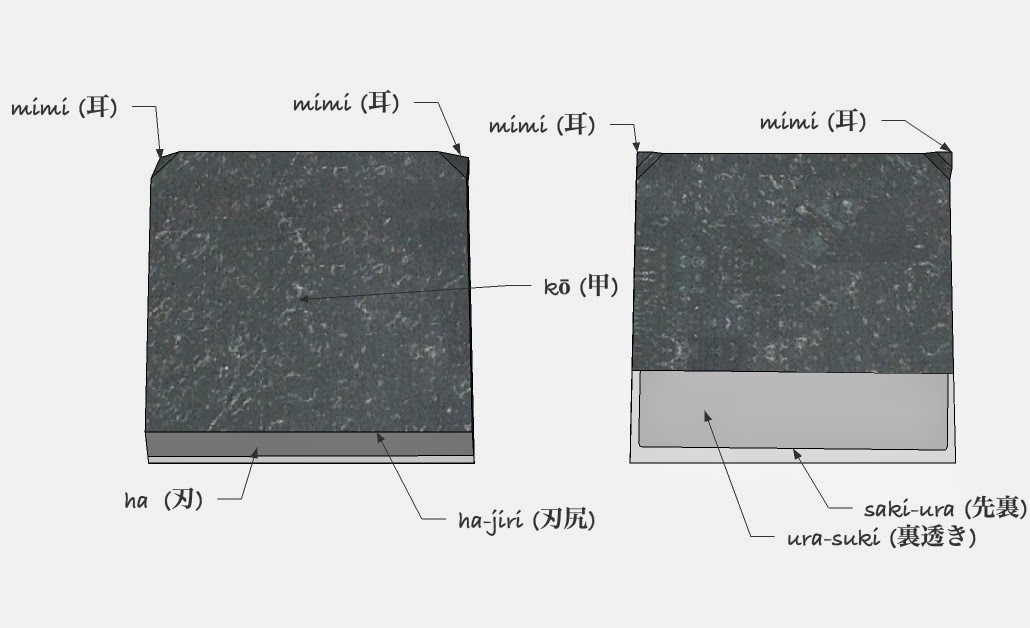
The main point of difference in relation to the terms associated to the main blade are the mimi ('ears'). On the main blade the mimi are the corners of the cutting edge, on the sub-blade they are the bent-over or fattened upper ends of the iron body.
Chipbreakers come in two basic varieties, those with a laminated construction, and those which are not. The cheaper planes usually come with a non-laminated chipbreaker, and for the function they provide in the plane itself they are acceptable.
A lot of blacksmiths concentrate on forging blades and do not normally also make a chipbreaker. Yokoyama would be an example - he rarely makes osae-gane. In such a circumstance, the plane will come with a chipbreaker - unless you specially ordered it as a single-blade plane - however the osae-gane which comes with the tool is a generic one made elsewhere, possibly in large batches by people who drink more than is healthy, if you know what I mean. This outsourcing can be good, or not so good, depending. Maybe it boils down to whether it was a Monday or not. If you want a chipbreaker made by the same blacksmith, using the same cutting steel as is found in the kannami, then you need to specify this when ordering in some cases, the term being tomo-osae. Osae is short for osae-gane, while tomo means 'with'. The Japanese term for 'friend', just for a little background, is tomo-dachi.
As with the kannami, the chipbreaker might come to you twisted and with sori. And as before, you could choose to ignore the ramifications and just plow on ahead and flatten the hagane portion of the chipper on a sharpening stone. As with the kannami, if the hagane on the chipper is curved, and you resort to the short cut, the expedient of flatting the entire portion of hagane upon the stone, a gourd shaped ura-suki will result. I can assure you that you won't be put in prison for this - it's highly unlikely that anyone else in your circle of acquaintances will have the foggiest notion there is something amiss, but if a Japanese plane guru shows up at your shop one day, you may wish to keep the chipbreaker with deformed ura on the down-low. It can be our little secret.
If you choose however to try and make a nicer ura on the osae-gane, it is possible to follow all the same steps as have already been shown in this thread for dealing with a main blade having 'problems':
-ura-age to remove twist
-ura-dashi to shape the ura-suki
-working the ura-suki with a piece of sharpening stone to improve its shape
Some people do follow all those steps and end up with a beautiful ura-suki on their chipbreaker, thin legs and ito-ura. When you think about it though, there is no reason other than aesthetics and pride to go to such an extent of refined finish with the osae-gane. After all, the sub-blade doesn't fit into a wedge-shaped opening in the dai, but sits on top of the kannami, essentially bearing on three points. Thus, the shape does not have to be as precisely set and kept up. So long as the edge of the chipper is flat and bears cleanly against the land of the main blade, all is good.
Also, the hagane portion of the osae-gane is very short, and the trick of sticking a regular size feeler gauge under the surface to ascertain the sori is not going to work, and detecting twist is not going to be easy either with such a short registration surface. And again, all that matters is that the chipper meet the main blade cleanly, ura to ura, and if the hagane portion is twisted it is somewhat irrelevant.
Tapping out a thin piece of metal with a shorter bevel is much trickier than a larger blade, and it is a riskier proposition. If it is not necessary for practical reasons, then the risk (cracked or chipped blade) seems to outweigh the benefits (a pretty ura-suki). If you choose to perform ura-dashi on a sub-blade, I suggest using a lighter and smaller hammer than you would use on the main.
And, finally, the chipbreaker, once it is set up, is not really worked again, with little to no future need to 'sharpen' it, tap it out, maintain the shape of the ura-suki, etc.. So, the reasons one might take care of the shape of the ura-suki on the main blade simply do not apply to the sub-blade.
All of the foregoing realities means that setting up the osae-gane can follow a different path than the one followed with the kannami.
Before you tackle the osae-gane set up, it is worthwhile taking a look at its shape, which should be slightly domed. Use a straightedge to assess.
Here's a perfect one:

The domed shape means that when the chipper is under the osae-bo (fixing pin) the pressure will be evenly spread out over the surface and it will slightly flatten out, maintaining even contact along the ura-to-ura meeting zone..
Now, here's a shitty one:

This one was hopeless. If fitted under the osae-bo, the sides of the chipper will be pressed down hard, but not the middle, which can lead the chipper to bulge slightly in the middle, losing positive registration with the main blade right in the middle of the land at the edge where it is most critical.
You could try to repair such a chipper, using a similar technique to that used to remove twist from the main blade, setting up the chipper on an anvil with copper shims under both sides and then whomping the middle with a drift to obtain a bulged shape. More drastic solutions involve filing metal off of the top of the osae-gane until it does have the domed shape, which makes a mess out of the part, appearance-wise. Or, you could smack the osae-bo in the middle to bend it downward to meet the middle of the chipper, but this is a poor solution as a bowed osae-bo can more readily rotate when the chipper is pushed tightly against it.
A more radical repair is to file the osae-bo to obtain clearance at either side, like this:

That step seems a bit drastic to me, and weakens the osae-bo to a degree, so it's not what I would do if I had other options available.
Or you could send the defective chipbreaker back to the seller - what I would recommend you do in most cases. In this case, I elected to make the plane a single blade (ichi-mai ba) only, and toss the chipbreaker out altogether. The plane maker in question with that particular blade set has recently retired, and didn't often make osae-gane, and his main blade was the one in previous posts which was twisted and deformed, so I decided to cut my losses, so to speak.
Once you've got a good chip breaker to deal with, we move onto flattening the back.
I place a piece of 1/2"-wide UHMW 0.005" adhesive-backed tape on the various chipbreakers I had to set up:

I move the back along the edge of the scrupulously-flattened coarse stone, keeping all the pressure on the bevel:

I do about 10 strokes on each side of the stone, then I turn the blade over and make use of the middle strip of the stone to work the bevel for 10~20 strokes:

Then the stone is dressed flat again and the process repeated, as needed.
After a round or two, you can see an even scratch pattern formed along the land of this osae-gane:

The UHMW tape definitely lasts longer than the other tapes I have tried.
The bevel is now roughed in after work on the coarse stone:

On to the medium stone, where the process is repeated. A good test for when you have a flat bevel is that the blade will stick to the stone on its bevel:

After the 3000 stone the bevel is more refined:

Here's the back of another chipper after the 3000:

Another one:

If your main blade is straight along the edge, the osae-gane should also be straight. If the main blade is formed with a curved edge, then the osae-gane should also be finished to that same curve. When the osae-gane is set back from the blade edge, it needs to be set back evenly all the way across, which would be impossible if the main blade was curved and the osae-gane was straight.
Step 7: Ni-dan Togi
We follow a slightly different procedure with prepping the bevel of the osae-gane as compared to the main blade, kannami. The kannami is taken out to as sharp a degree as you want or are able to take it, but the edge of the osae-gane is not meant for slicing, but for breaking the chip. It's more like a plow than a blade. The osae-gane needs to have a second bevel at the blade tip, and this bevel serves as a little wall to repel the invader, so to speak.
Here's the geometry - the bevel of the chipper is usually around 24˚~25˚, and a 70˚~80˚ secondary bevel - ni-dan - is placed at the very tip:
The above drawing is from the book 図でわかる大工道具 (Zu De Wakaru Daiku Dōgu). The length of be secondary bevel is shown as 0.5mm, however this should be taken as a generic number, somewhere in the middle of the range. A plane intended for rough stock removal will have a larger mouth opening and take thick shavings, and so can accommodate a wider secondary bevel on the chipper - up to 1.0mm. A finishing plane will have a tight mouth and take the thinnest shavings, so the secondary bevel can be around 0.2mm.
The purpose of the secondary bevel is to fold back the shaving just after the main blade takes the cut:
Given the function of the secondary bevel, some might conclude that the secondary bevel could be large as we please without penalty. This is only true however if one takes no account of the plane mouth's opening. The relationship between the secondary bevel on the chipper and the mouth opening is an important one and not immediately apparent, so I think it might be good to take a moment here to have a look at that....
The mouth opening is called ha-guchi (刃口) or kuchi-ba (口場). A narrow mouth, as might be typical on a finishing plane, is on the order of 0.5mm wide. With a chipbreaker having a secondary bevel of 0.2mm width, the shaving takes the following route:

Keeping everything else the same (depth of cut, width of mouth, set back of chipbreaker from main blade edge), we now use a chipbreaker with a 0.75mm wide secondary bevel:

As you can see, the wider secondary bevel on the chipbreaker means that the entire piece is set further down the main blade and the result is likely to be shavings getting jammed in the mouth. With a wide mouth opening the large secondary bevel works fine of course.
There are two schools of thought on what the secondary bevel angle should be. Some put it at 40˚~50˚, while others put it at 70˚~80˚. The steeper the bevel, the more pronouncedly the shaving is broken back. Some woods will plane fine with a 40˚~50˚ secondary bevel. If you run into problems with tear out though, the bevel can be steepened to improve the chip-breaking aspect. I've tended to set up my planes with the 70˚~80˚ secondary bevel, however this is in part a reflection of the woods I've been working in recent years.
To establish the secondary bevel, place the sharpened osae-gane on a middle-grit stone, angling it up so that the ura side (the hagane) is tilted 70˚~80˚ relative to the stone - here closer to 70˚:

If you're unsure of the angle, you could make up a wooden block to use as a jig, here set at 80˚:
Work the secondary bevel angle on the stone 10~15 strokes, then repeat the process on the finishing stone, and re-dress the ura to clean up the bevel.
I tend to err on the side of caution with this step in terms of the secondary bevel size, as it is a little easier to add more secondary bevel later on than it is to reduce it. You can see the secondary bevel in this view:

The secondary is probably sitting at around 0.1~0.15mm at this point.
Many articles on Japanese plane set up will next tell you to set the osae-gane to fit onto the main blade. I'd advise against that. It can wait for the time being, as there are other things to deal with first. If you set up the osae-gane now, you may have issues later on involving the osae-bo and/or the overall fit of the blades into the plane.
Removing the UHMW tape seems to bring with it a little black:

The osae-gane looked fine after I rubbed them a few times with a cloth, however, so all was good.
We've now got the kannami and osae-gane most of the way there. I leave final polishing of the blade bevel and ura until later on. The osae-gane has to fit between the main blade and the osae-bo, and the main blade position is relative to it's fit within the dai, which we turn our attention to next.
Thanks for visiting the Carpentry Way.


