鉋 kanna. n.: a simple carpenter's tool consisting of a wooden block, a metal pin, a main blade and, usually, a sub-blade or chipbreaker. A kit of parts which can be set up to take extraordinarily fine shavings and leave a glassy polished surface.
In the previous post I mentioned the tape technique as a means of dealing with cutting steel curvature (sori) in a plane blade. It's not a perfect method, and it's not foolproof. I've tried a variety of different approaches, and it seems to work the best so far, and some of the best plane users in Japan use the method, so that is something. I imagine there might be a better way. Super thin 0.004" UHMW plastic tape with an adhesive backing might be the cat's ass, but a roll of this from 3M costs something like $150, so I didn't think this was a reasonable option. There is a roll of slightly thicker UHMW tape, not from 3M, that I picked up at a reasonable price, however I will save it for next time as all my planes are through the round of straightening.
Once you have the and twist and curvature out of the blade, you may have a good shape to the perimeter of the hollow, the ura-suki, or you may not. The next step is dealing with the shape of the ura-suki and making it 'more-better'.
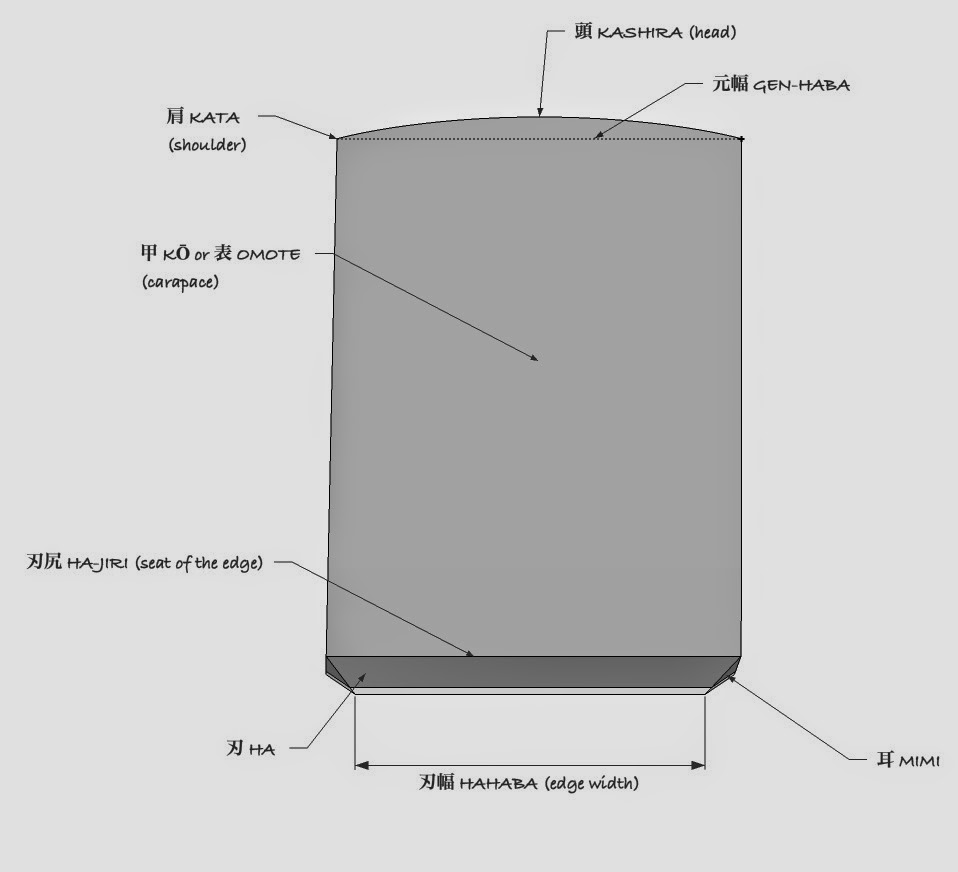
Before I get to that step though, I thought it would be helpful to post a picture giving the terms for the various parts of the main blade, kannami, something readers can refer back to if they start getting lost in the thicket of terms. I think it is easier to use the Japanese terms for these parts than trying to make up English equivalents.
The omote (front) side:
![]()
Also found on the front side, sometimes, will be the manufacturer's serial number, sei-zō-ban-gō (製造番号). The character for 'head' (頭), is also read 'atama'.
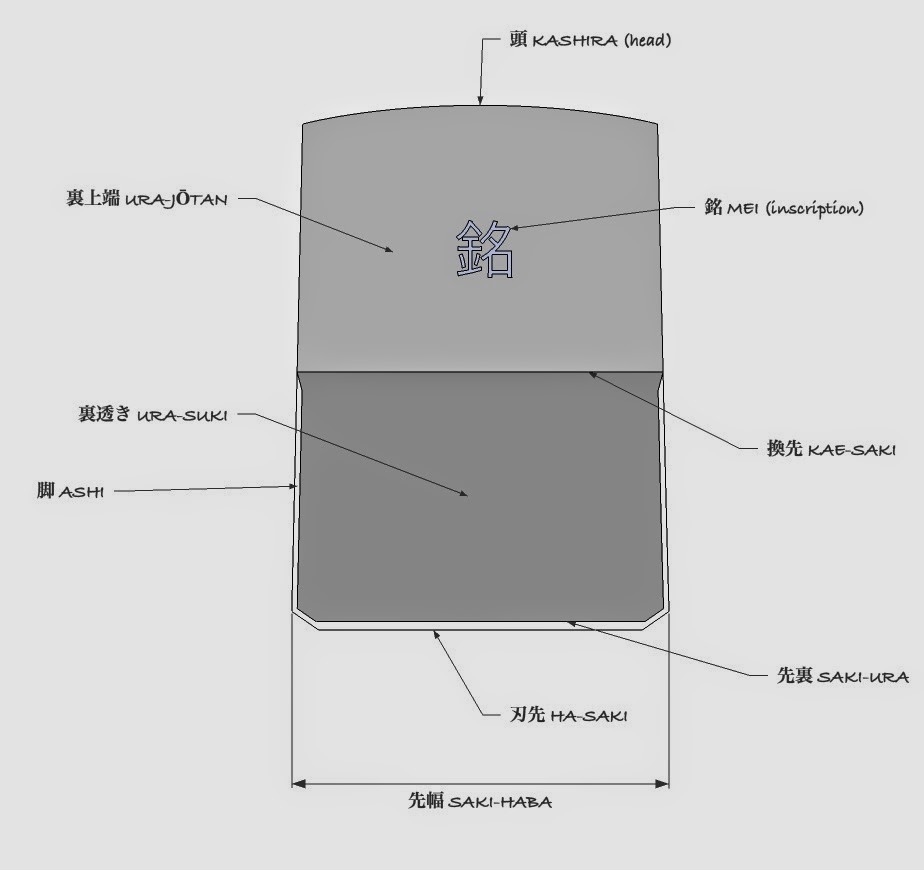
The ura (rear) side:
![]()
If, in future descriptions (or foregoing ones for that matter) involving specialized Japanese terms for the blade parts, please refer back to the above two drawings. I often use the term 'ura' to refer to the ura-suki, or hollow portion. 'Ura' in fact can also describe the entire back of the blade seen in the above picture, serving as an abbreviation for kannami-zentai-no-ura (鉋刃全体を裏).
The space between the blade tip, ha-saki, and start of the hollow, saki-ura, I often refer to as the 'landing'. Some term it ura-ba.
Step 5: Ura Dashi (裏出)
In the previous post I indicated that one of my blades, to the right in the picture below, had a landing that was a little skinnier than I would like:
![]()
It was a hair less than 1mm, and I would prefer a little over 1mm. To make the landing a bit wider, one could simply flatten the back some more on the sharpening stones, which would tend to also fatten up the side landings, or ashi, of the blade. This is heading down the wrong road however, as explained previously -and will be repeated later on (don't say I didn't warn you in advance).
The method for obtaining a wider land at the blade edge is to hammer the iron side of the bevel so as to cause the portion of the hollow below to deflect downwards. This technique is called ura-dashi, which means "hollow come out". Westerners often term this 'tapping out' the blade.
For this task you need an anvil with a rounded edge, like this one:
![]()
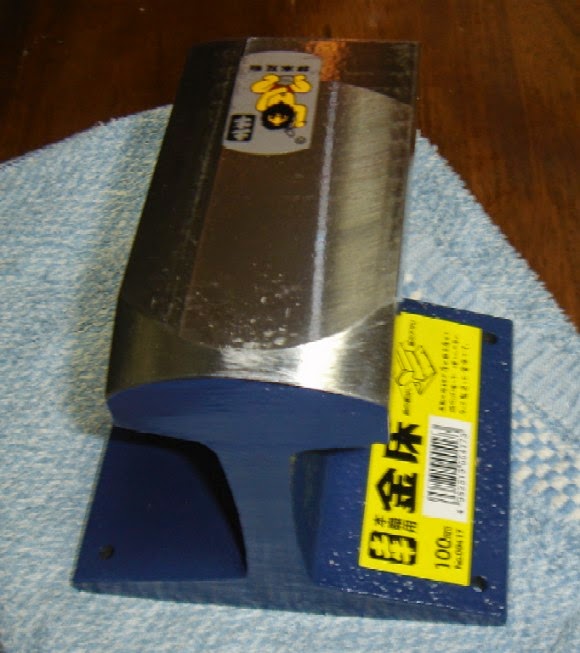
There are other shapes of anvil used for ura-dashi, however the use of a section of non-hardened railway track extrusion is common in Japan. The anvil has rounded corners, at least on one end, so that there is no sharp surface against the blade's hollow.
Here's a commercially-sold anvil for ura-dashi, with a more pronounced rounding of the end than mine:
![]()
Here's another one, customized a bit differently, with a modified boat-builder's hammer on top to boot:
![]()
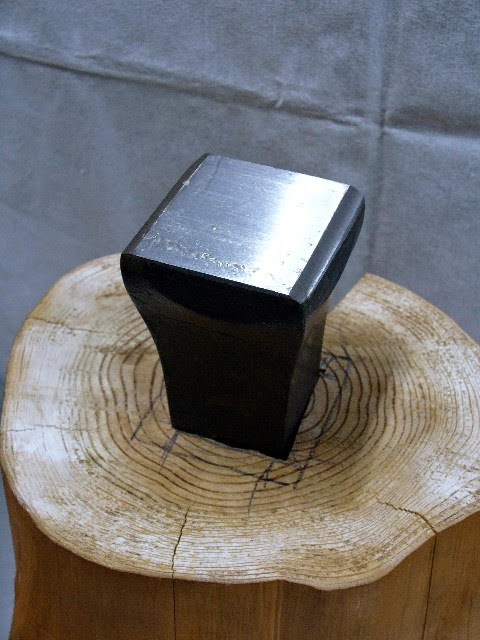
And another type of anvil made for ura-dashi:
![]()
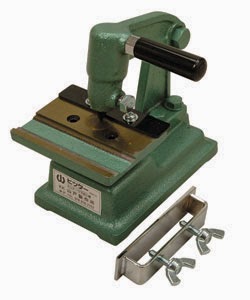
There are also tools made just for ura-dashi, which take the place of the anvil and hammer. Here's a common one, which simply guides a punch - you still need to swing a hammer:
![]()
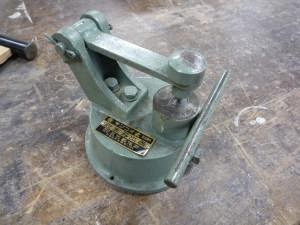
Here's another, the hinged type, so you can dispense with the hammer:
![]()
And another hinged type which does use a hammer:
![]()
A good hammer for ura-dashi is medium weight and has pointy, yet slightly rounded head - though some folks use a regular plane-setting hammer, or chisel-striking hammer, and use just the corner of the head. This works, however the fat head of the hammer obscures the view a bit, and closely viewing what you are doing is vital. I like to use a funa-te-gennō, or boat-builder's hammer, as it has a pick-like end and is reasonably slim overall.
Ura-dashi involves supporting the ura-suki on an anvil and striking the bevel with the tip of the hammer - the next picture shows what the bevel looks like after a round:
![]()
The piece of heavy paper (like a postcard or business card) serves two purposes. One is to slightly dampen the shock, as shock is what can precipitate cracking in the hagane. The paper also spares the ura-suki from taking on marks from the anvil surface. An alternative is to use a piece of adhesive-backed veneer tape (or a couple of layers of cloth tape) on the corner of the anvil. My first finger lies under the blade and acts as a 'fence' against the edge of the anvil.
Tapping out the blade can lead to unhappy outcomes if you are not careful, so it is not something you want to do after having a few beers.
Here's an illustration from Kunimoto showing the portion of the bevel which is struck by the hammer tip:
![]()
Notice the extent of the striking zone, tataku han-i, (叩く範囲) which is entirely on the jigane (iron) portion. The hammer strikes are light (弱く) as you get towards the blade tip, and heavy (強く) as you approach to top of the bevel. The bulk of your strikes should be concentrated about where the hammer tip is placed in the above sketch, around 1/3 of the way down the bevel. You can tell when you have the blade positioned correctly on the anvil as the sound of striking will have a 'thunk' to it - you want to avoid a metallic tinny noise, which means the impact zone is not well supported.
Errant strikes which hit close to the forge weld line, or, god help you, on the hagane itself, are liable to chip or crack the blade, which can render the blade garbage, or at best necessitate the removal of a large portion of the blade end, shortening the usable lifespan by quite a bit. A whole lot of grinding follows the chip out, followed by - you guessed it - more ura-dashi. Lots more.
So, some may wonder exactly what ura-dashi is doing, on a mechanical level. Essentially, the strikes sink into the jigane and thereby cause it to spread, expanding slightly crosswise to the bevel surface. This spreading then causes the steel, which is not capable of much elongation (it is not especially ductile) to bend, having the effect of pushing the blade tip down, as this following sketch shows:
![]()
Note the comment on the bottom, "刃金は伸性がないので伸びない", which means, "the cutting steel isn't ductile, so it can't elongate". It bends downward instead.
During forging, the beveled end of the blade, as it has a reduced mass compared to the rest of the body, can often get overcooked slightly and the hagane at the end of the blade is more brittle than it is in the rest of the blade body. So, tapping out a brand new blade tends to be more fraught with peril than tapping out a well-used blade.
If the entire land of your blade is on the thin side (i.e. less than 0.5mm), then you would want to tap out along almost the entire width of the bevel. Here's the idea:
![]()
I say almost the entire width of the bevel - in most cases you should do so. An exception would be if the ura land right behind the mimi is on the thin side
In some cases, the land will be adequately wide at some locations, and a bit thin in others. One seeks to obtain an even width land, so the strategy is to tap out only in those areas where you seek to enlarge the land. This will cause the blade bevel face to have a hollow in the tapped area afterwards, so when you are re-flattening the bevel, it will look something like this as you get underway:
![]()
If the rough bevel angle is in the target zone, you only need to flatten the bevel until the hollow is gone completely across the hagane portion - the pock marks can be left. If the bevel is too obtuse however, then you can flatten the bevel off and make the angle more acute by removing a bit more of the iron, and the reuslt will mean the pock marks are removed.
When done with flattening after tapping out, I ended up with a land of suitable size:
![]()
I could have done perhaps another round of ura-dashi, however I was satisfied with the shape.
As noted in the first post in this series, one of my plane blades had some twist which needed removal. After that was dealt with, a large amount of sori was then removed, the ura-suki shape which resulted was a little malformed:
![]()
I could leave this as is, but decided to remove some of the deformity on the left side. I started by some light passes using a Dremel grinding bit chucked into a 1/8" collet in my Porter Cable 310 trim router, making the cuts freehand with the tool in a sideways position. I would have used a Dremel if I owned one. That grinder hogged out material with relative ease, but the surface wasn't the smoothest. My connection at Japan Tool mentioned a method he had seen to re-shape the ura using a chunk of coarse sharpening stone, so I decided to give that a try.
Before continuing, I should mention that the ura is originally formed in the making of the tool by grinding the back with an abrasive wheel or scraping it with a sen. Both of those operations are undertaken before the hagane has been tempered, so the steel is considerably easier to work. I considered trying to scrape the ura on my plane blade using a carbide scraper, but according to what I read, a carbide scraper will have a tough time on such hard steel. It might be worth a look at all the same at some point.
So, onto the sharpening stone method. I took a Shapton Pro 2000# stone and used a diamond wheel on my angle grinder to slice off a piece. Then I mounted the piece in a crosswise dado between two pieces of teak, like this:
![]()
You could choose to clamp the block using the two sticks and your hand pressure, however I fitted screws to effect the clamping so I could relax my hands a bit. Another view:
![]()
To use, clamp the blade down so it can't wiggle about, and then go on the attack, like this:
![]()
It's a slow process. Grind a while with the stone, then dress the back on your polishing stone and see how the ura-suki shape looks. Repeat until you obtain the shape you want. Repeat, repeat, repeat....
Here's how mine came out:
![]()
It's not a perfect ura-suki, but it will do. At least it is straight, non-twisted, and flat. After 6 hours on that blade total, I'm taking a break.
Some might wonder why go through all the bother with this ura-dashi process. It is simpler after all to just re-flatten the back, doing a run from the coarse stone to your finish stone. This is how the blade would look after a while:
![]()
An ura which has not been tapped out eventually comes to have a shape akin to an arched Japanese bridge, or taiko-bashi, and in most cases the land in the middle of the blade remains perpetually on the thin side.
However, with a plane blade, given that it fits into a wedged slot in the dai, a re-flattening of the back will move the plane blade in the direction of an increasingly loose fit. And, as mentioned previously, widening the portion of the ura which is cutting steel, i.e., the land and the ashi, makes the flattening process itself more and more work and more difficult to achieve a good result.
The Japanese have terms for the two shapes of ura:
![]()
On the left is the desired ito-ura ('thread'ura), while on the right is the sucky beta-ura. 'Beta' means 'as-is', 'nothing special', 'the usual', etc. Beta-ura involves fat legs (ashi). Once you have formed beta ura on the tool, sharpening becomes progressively more difficult, especially given the fact that for a truly sharp edge, obtaining a flat plane on the land is essential.
To obtain the benefit of a super-hard cutting steel that is readily flatten-able, the hollow is part of the package. To fit a plane blade consistently to the dai over time, maintaining the hollow properly by tapping out and not over-working the back is the key.
All for now. The series continues...
In the previous post I mentioned the tape technique as a means of dealing with cutting steel curvature (sori) in a plane blade. It's not a perfect method, and it's not foolproof. I've tried a variety of different approaches, and it seems to work the best so far, and some of the best plane users in Japan use the method, so that is something. I imagine there might be a better way. Super thin 0.004" UHMW plastic tape with an adhesive backing might be the cat's ass, but a roll of this from 3M costs something like $150, so I didn't think this was a reasonable option. There is a roll of slightly thicker UHMW tape, not from 3M, that I picked up at a reasonable price, however I will save it for next time as all my planes are through the round of straightening.
Once you have the and twist and curvature out of the blade, you may have a good shape to the perimeter of the hollow, the ura-suki, or you may not. The next step is dealing with the shape of the ura-suki and making it 'more-better'.
Before I get to that step though, I thought it would be helpful to post a picture giving the terms for the various parts of the main blade, kannami, something readers can refer back to if they start getting lost in the thicket of terms. I think it is easier to use the Japanese terms for these parts than trying to make up English equivalents.
The omote (front) side:
Also found on the front side, sometimes, will be the manufacturer's serial number, sei-zō-ban-gō (製造番号). The character for 'head' (頭), is also read 'atama'.
The ura (rear) side:
If, in future descriptions (or foregoing ones for that matter) involving specialized Japanese terms for the blade parts, please refer back to the above two drawings. I often use the term 'ura' to refer to the ura-suki, or hollow portion. 'Ura' in fact can also describe the entire back of the blade seen in the above picture, serving as an abbreviation for kannami-zentai-no-ura (鉋刃全体を裏).
The space between the blade tip, ha-saki, and start of the hollow, saki-ura, I often refer to as the 'landing'. Some term it ura-ba.
Step 5: Ura Dashi (裏出)
In the previous post I indicated that one of my blades, to the right in the picture below, had a landing that was a little skinnier than I would like:

It was a hair less than 1mm, and I would prefer a little over 1mm. To make the landing a bit wider, one could simply flatten the back some more on the sharpening stones, which would tend to also fatten up the side landings, or ashi, of the blade. This is heading down the wrong road however, as explained previously -and will be repeated later on (don't say I didn't warn you in advance).
The method for obtaining a wider land at the blade edge is to hammer the iron side of the bevel so as to cause the portion of the hollow below to deflect downwards. This technique is called ura-dashi, which means "hollow come out". Westerners often term this 'tapping out' the blade.
For this task you need an anvil with a rounded edge, like this one:

There are other shapes of anvil used for ura-dashi, however the use of a section of non-hardened railway track extrusion is common in Japan. The anvil has rounded corners, at least on one end, so that there is no sharp surface against the blade's hollow.
Here's a commercially-sold anvil for ura-dashi, with a more pronounced rounding of the end than mine:
Here's another one, customized a bit differently, with a modified boat-builder's hammer on top to boot:

And another type of anvil made for ura-dashi:
There are also tools made just for ura-dashi, which take the place of the anvil and hammer. Here's a common one, which simply guides a punch - you still need to swing a hammer:

Here's another, the hinged type, so you can dispense with the hammer:
And another hinged type which does use a hammer:
A good hammer for ura-dashi is medium weight and has pointy, yet slightly rounded head - though some folks use a regular plane-setting hammer, or chisel-striking hammer, and use just the corner of the head. This works, however the fat head of the hammer obscures the view a bit, and closely viewing what you are doing is vital. I like to use a funa-te-gennō, or boat-builder's hammer, as it has a pick-like end and is reasonably slim overall.
Ura-dashi involves supporting the ura-suki on an anvil and striking the bevel with the tip of the hammer - the next picture shows what the bevel looks like after a round:

The piece of heavy paper (like a postcard or business card) serves two purposes. One is to slightly dampen the shock, as shock is what can precipitate cracking in the hagane. The paper also spares the ura-suki from taking on marks from the anvil surface. An alternative is to use a piece of adhesive-backed veneer tape (or a couple of layers of cloth tape) on the corner of the anvil. My first finger lies under the blade and acts as a 'fence' against the edge of the anvil.
Tapping out the blade can lead to unhappy outcomes if you are not careful, so it is not something you want to do after having a few beers.
Here's an illustration from Kunimoto showing the portion of the bevel which is struck by the hammer tip:

Notice the extent of the striking zone, tataku han-i, (叩く範囲) which is entirely on the jigane (iron) portion. The hammer strikes are light (弱く) as you get towards the blade tip, and heavy (強く) as you approach to top of the bevel. The bulk of your strikes should be concentrated about where the hammer tip is placed in the above sketch, around 1/3 of the way down the bevel. You can tell when you have the blade positioned correctly on the anvil as the sound of striking will have a 'thunk' to it - you want to avoid a metallic tinny noise, which means the impact zone is not well supported.
Errant strikes which hit close to the forge weld line, or, god help you, on the hagane itself, are liable to chip or crack the blade, which can render the blade garbage, or at best necessitate the removal of a large portion of the blade end, shortening the usable lifespan by quite a bit. A whole lot of grinding follows the chip out, followed by - you guessed it - more ura-dashi. Lots more.
So, some may wonder exactly what ura-dashi is doing, on a mechanical level. Essentially, the strikes sink into the jigane and thereby cause it to spread, expanding slightly crosswise to the bevel surface. This spreading then causes the steel, which is not capable of much elongation (it is not especially ductile) to bend, having the effect of pushing the blade tip down, as this following sketch shows:

Note the comment on the bottom, "刃金は伸性がないので伸びない", which means, "the cutting steel isn't ductile, so it can't elongate". It bends downward instead.
During forging, the beveled end of the blade, as it has a reduced mass compared to the rest of the body, can often get overcooked slightly and the hagane at the end of the blade is more brittle than it is in the rest of the blade body. So, tapping out a brand new blade tends to be more fraught with peril than tapping out a well-used blade.
If the entire land of your blade is on the thin side (i.e. less than 0.5mm), then you would want to tap out along almost the entire width of the bevel. Here's the idea:

I say almost the entire width of the bevel - in most cases you should do so. An exception would be if the ura land right behind the mimi is on the thin side
In some cases, the land will be adequately wide at some locations, and a bit thin in others. One seeks to obtain an even width land, so the strategy is to tap out only in those areas where you seek to enlarge the land. This will cause the blade bevel face to have a hollow in the tapped area afterwards, so when you are re-flattening the bevel, it will look something like this as you get underway:

If the rough bevel angle is in the target zone, you only need to flatten the bevel until the hollow is gone completely across the hagane portion - the pock marks can be left. If the bevel is too obtuse however, then you can flatten the bevel off and make the angle more acute by removing a bit more of the iron, and the reuslt will mean the pock marks are removed.
When done with flattening after tapping out, I ended up with a land of suitable size:

I could have done perhaps another round of ura-dashi, however I was satisfied with the shape.
As noted in the first post in this series, one of my plane blades had some twist which needed removal. After that was dealt with, a large amount of sori was then removed, the ura-suki shape which resulted was a little malformed:

I could leave this as is, but decided to remove some of the deformity on the left side. I started by some light passes using a Dremel grinding bit chucked into a 1/8" collet in my Porter Cable 310 trim router, making the cuts freehand with the tool in a sideways position. I would have used a Dremel if I owned one. That grinder hogged out material with relative ease, but the surface wasn't the smoothest. My connection at Japan Tool mentioned a method he had seen to re-shape the ura using a chunk of coarse sharpening stone, so I decided to give that a try.
Before continuing, I should mention that the ura is originally formed in the making of the tool by grinding the back with an abrasive wheel or scraping it with a sen. Both of those operations are undertaken before the hagane has been tempered, so the steel is considerably easier to work. I considered trying to scrape the ura on my plane blade using a carbide scraper, but according to what I read, a carbide scraper will have a tough time on such hard steel. It might be worth a look at all the same at some point.
So, onto the sharpening stone method. I took a Shapton Pro 2000# stone and used a diamond wheel on my angle grinder to slice off a piece. Then I mounted the piece in a crosswise dado between two pieces of teak, like this:

You could choose to clamp the block using the two sticks and your hand pressure, however I fitted screws to effect the clamping so I could relax my hands a bit. Another view:

To use, clamp the blade down so it can't wiggle about, and then go on the attack, like this:

It's a slow process. Grind a while with the stone, then dress the back on your polishing stone and see how the ura-suki shape looks. Repeat until you obtain the shape you want. Repeat, repeat, repeat....
Here's how mine came out:

It's not a perfect ura-suki, but it will do. At least it is straight, non-twisted, and flat. After 6 hours on that blade total, I'm taking a break.
Some might wonder why go through all the bother with this ura-dashi process. It is simpler after all to just re-flatten the back, doing a run from the coarse stone to your finish stone. This is how the blade would look after a while:
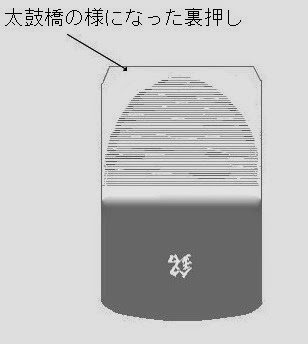
An ura which has not been tapped out eventually comes to have a shape akin to an arched Japanese bridge, or taiko-bashi, and in most cases the land in the middle of the blade remains perpetually on the thin side.
However, with a plane blade, given that it fits into a wedged slot in the dai, a re-flattening of the back will move the plane blade in the direction of an increasingly loose fit. And, as mentioned previously, widening the portion of the ura which is cutting steel, i.e., the land and the ashi, makes the flattening process itself more and more work and more difficult to achieve a good result.
The Japanese have terms for the two shapes of ura:

On the left is the desired ito-ura ('thread'ura), while on the right is the sucky beta-ura. 'Beta' means 'as-is', 'nothing special', 'the usual', etc. Beta-ura involves fat legs (ashi). Once you have formed beta ura on the tool, sharpening becomes progressively more difficult, especially given the fact that for a truly sharp edge, obtaining a flat plane on the land is essential.
To obtain the benefit of a super-hard cutting steel that is readily flatten-able, the hollow is part of the package. To fit a plane blade consistently to the dai over time, maintaining the hollow properly by tapping out and not over-working the back is the key.
All for now. The series continues...